

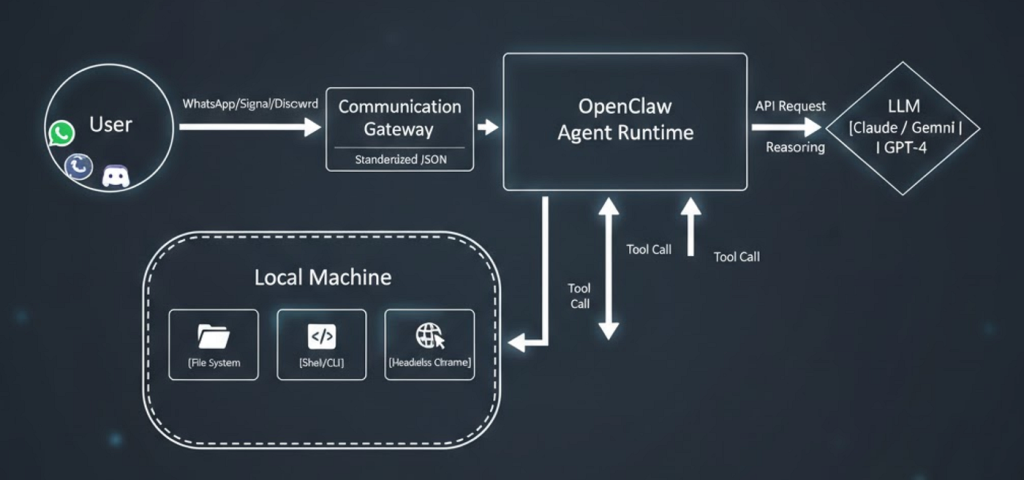
The landscape of personal productivity is shifting from passive chatbots to active agents. While tools like ChatGPT and Claude are excellent at generating text, they typically live inside a browser tab, waiting for you to come to them. Clawdbot, which has recently been rebranded as OpenClaw after a whirlwind series of name changes, represents a different philosophy. It is a self-hosted, proactive assistant that lives in your messaging apps and can execute tasks on your actual hardware.
Setting this up requires a bit of technical comfort, but it is far from impossible for a seasoned user. Because this tool interacts with your local files, terminal, and private communications, you should approach the installation with a security first mindset.
Preparing the ground
Before you run a single command, you need to ensure your environment meets the modern standards required by the OpenClaw architecture.
- Runtime Environment: You must have Node.js version 22 or higher. This is a hard requirement because the agent relies on the latest V8 engine features for handling asynchronous tool calls and agentic logic.
- Operating System: While it runs on macOS and Linux natively, Windows users should strictly use WSL2 (Windows Subsystem for Linux). Attempting to run this directly in PowerShell often leads to issues with native dependency compilation, specifically with the sharp library used for image processing.
- API Access: OpenClaw is an orchestration layer, not a model provider. You will need an API key from Anthropic (Claude) or OpenAI (GPT-4o) to serve as the brain of the operation.+1
The installation process
The community has largely moved toward a unified installer script that handles the heavy lifting of dependency resolution and initial onboarding.
Using the automated installer
For most users on macOS, Linux, or WSL2, the quickest path is the shell script. Open your terminal and execute the following:
curl -fsSL https://openclaw.ai/install.sh | bash
This script performs a few critical actions. It detects your operating system, checks for the correct Node.js version, and pulls the latest global CLI package. Once the binaries are in place, it will automatically launch the onboard wizard.+1
If you prefer to manage your global packages manually via npm, you can achieve the same result with:
npm install -g openclaw@latest openclaw onboard --install-daemon
Navigating the onboarding wizard
The onboarding process is where you define the personality and reach of your agent. During the wizard, you will be asked to:
- Select a Model Provider: This is where you paste your Anthropic or OpenAI API keys.
- Choose Messaging Channels: You can link the bot to Telegram, WhatsApp, Discord, or Slack. For Telegram, you will need to create a bot via BotFather and provide the token. For WhatsApp, the system typically uses the Baileys library to link via a QR code, similar to how you link WhatsApp Web.+2
- Install Skills: This is the most powerful part of the setup. Skills allow the agent to read your calendar, search your files, or browse the web. I recommend starting with the basic command-logger and filesystem skills to get a feel for the capability before granting access to your email or sensitive accounts.
Securing your instance
Because OpenClaw can run shell commands, a misconfigured instance is a significant security liability. If you are deploying this on a VPS (Virtual Private Server) like a DigitalOcean droplet or a Hostinger instance, do not leave the dashboard exposed to the open web.+1
Always use a strong password for the gateway and, ideally, wrap the management interface behind a Tailscale tunnel or a VPN. This ensures that even if someone finds your IP, they cannot send instructions to your agent.
Verifying the setup
Once the onboarding is finished, you can check the health of your installation by running:
openclaw doctor
This command diagnoses common issues like missing environment variables, expired API keys, or permission conflicts. If everything looks green, start the gateway:
openclaw gateway
You should now be able to send a message to your bot on your chosen platform. Try a simple command like: Check my current directory and tell me how many files are there. If it responds with the correct count, your agent is officially live and has access to its local environment.
Fine tuning and maintenance
OpenClaw is an evolving project with frequent updates. To keep your agent running smoothly and to benefit from the latest security patches, you should periodically update the CLI and the gateway.
npm update -g openclaw
If the bot ever becomes unresponsive, the logs are your best friend. You can view real time activity by running the gateway in verbose mode:
openclaw gateway --verbose
This will show you exactly how the LLM is interpreting your prompts and which local tools it is attempting to trigger.